This guide sets up a Google Chat bot so you can send direct messages to users on Google Chat via Memority notification system.
Audience: platform admins doing the one-time Google Cloud / Workspace setup, and QA verifying delivery.
What you get at the end: dispatching an event that sends a Google Chat DM to a target user.
How it works (30-second version)
-
A Google Cloud service account authenticates as a Chat bot.
-
Memority holds a notification definition (
my-googlechat-notification) that subscribes to an event type and names the recipient. -
An event is dispatched, bound to the notification definition → Memority resolves the recipient's numeric Google user id → posts the message as the service account.
⚠️ The bot can only open a DM conversation with a user if the app is installed org-wide (or the
user has messaged the bot at least once). This is why the Marketplace steps below matter.
Prerequisites
-
A Google Cloud project (steps 1–3) — admin rights required.
-
Google Workspace super-admin access for the org-wide install (step 4).
-
Memority running, with admin API access to the target tenant(step 6 onwards).
1. Create a Google Cloud project
-
Give it a name (e.g.
memority-googlechat) and create it. -
Select the project — note its Project number (used as the App Id later).
A Google Cloud project is an app, it will contain the configuration, permissions, credentials, used by our Bot.
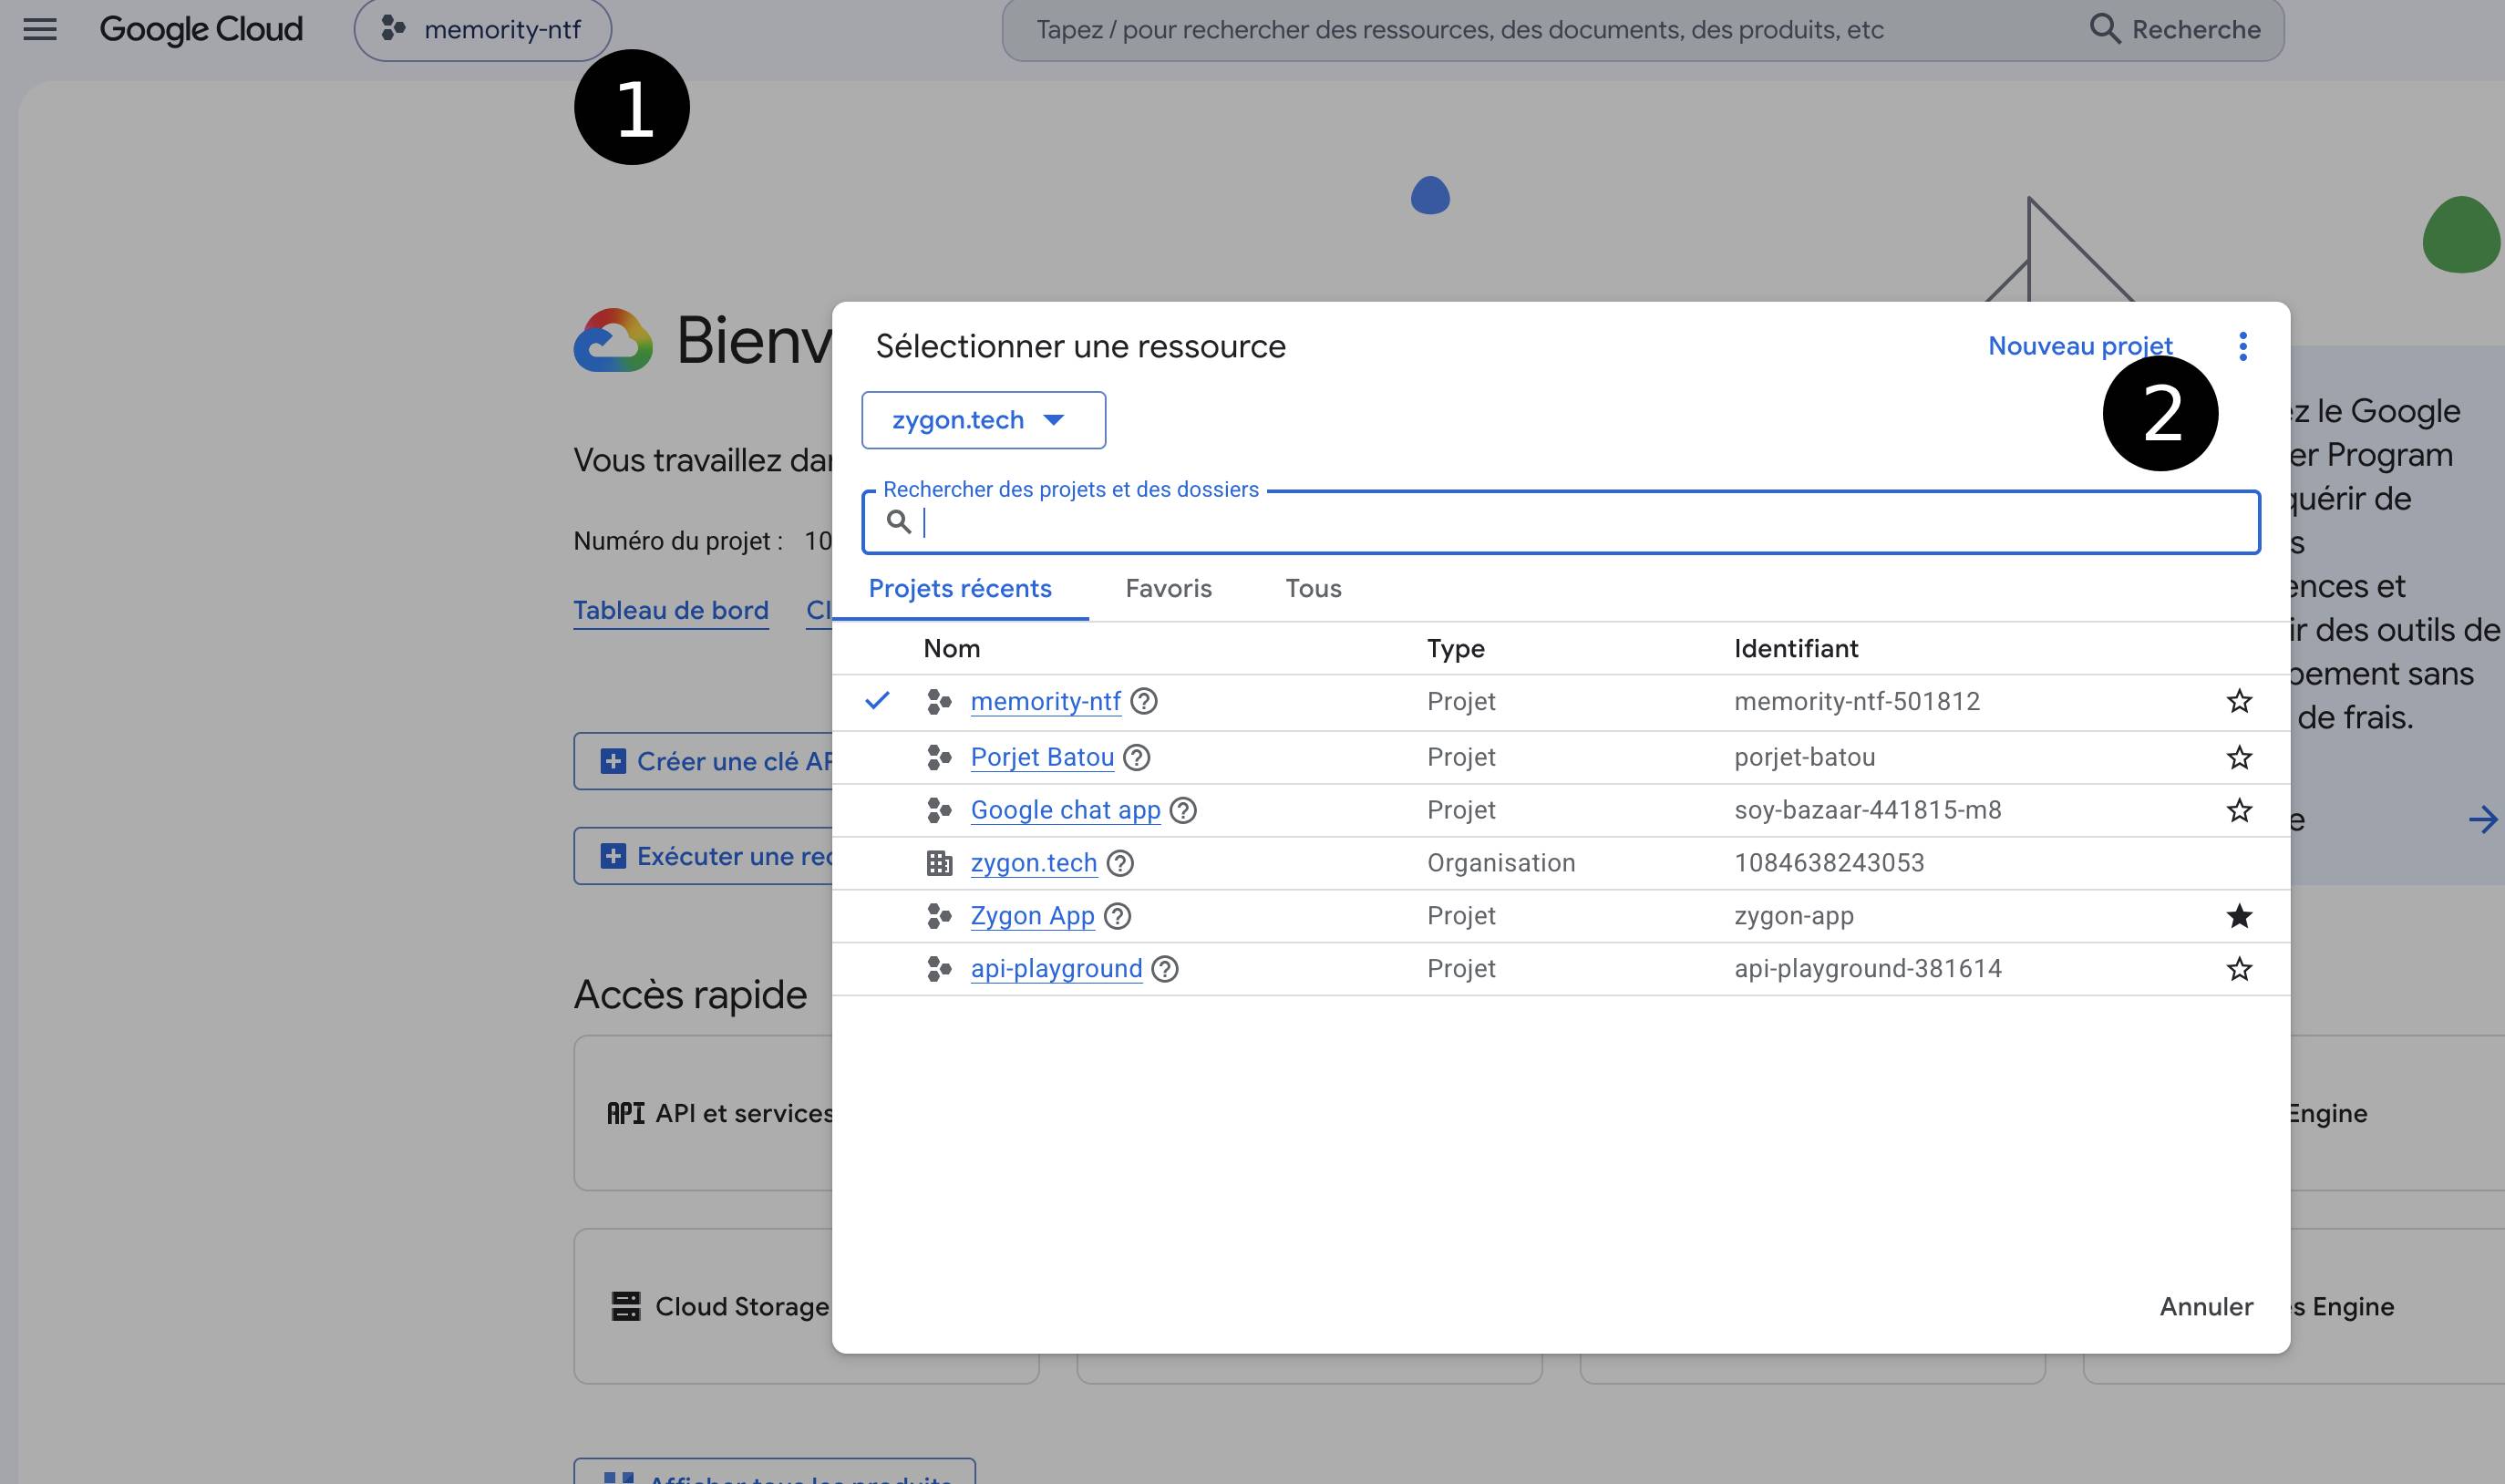
creation of a project
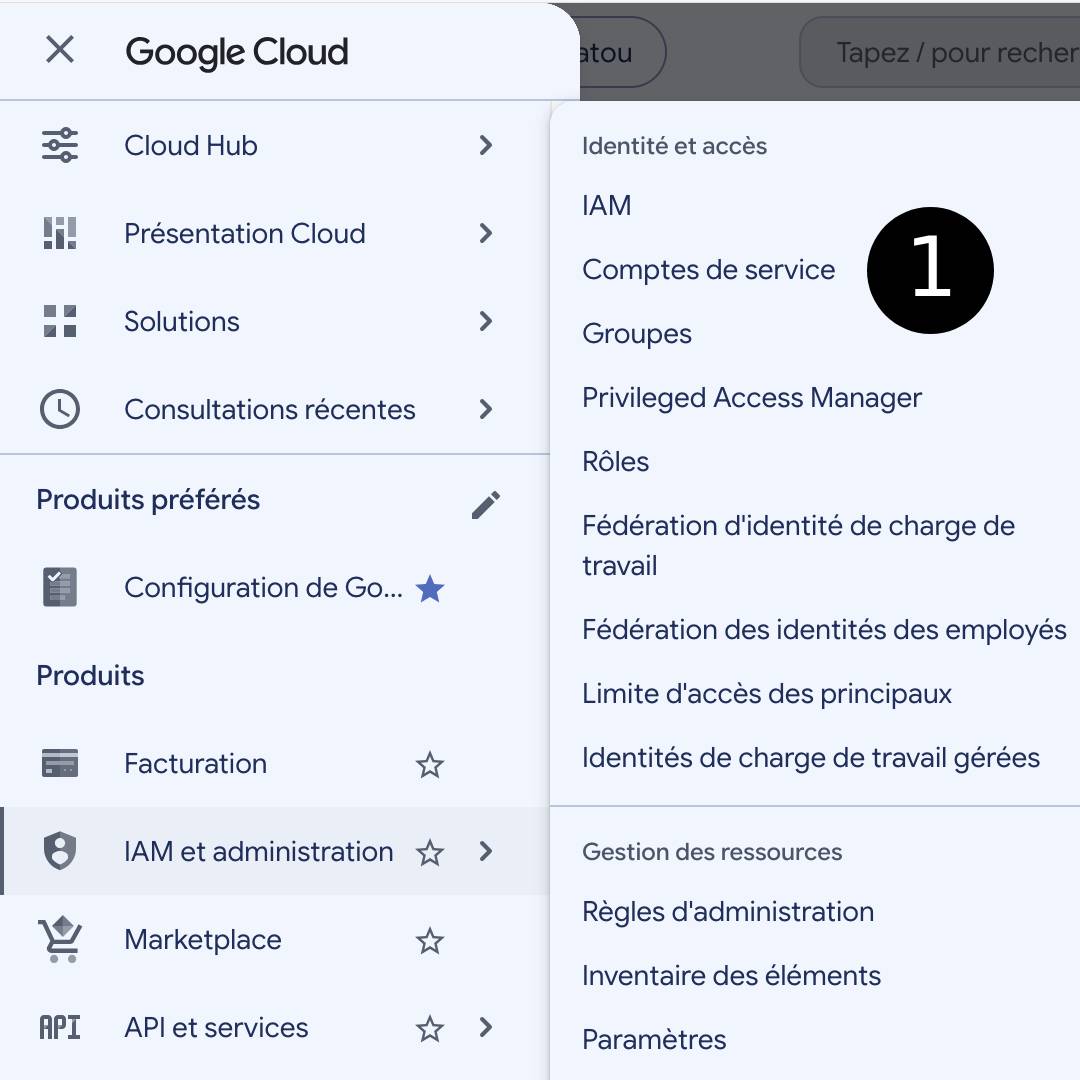
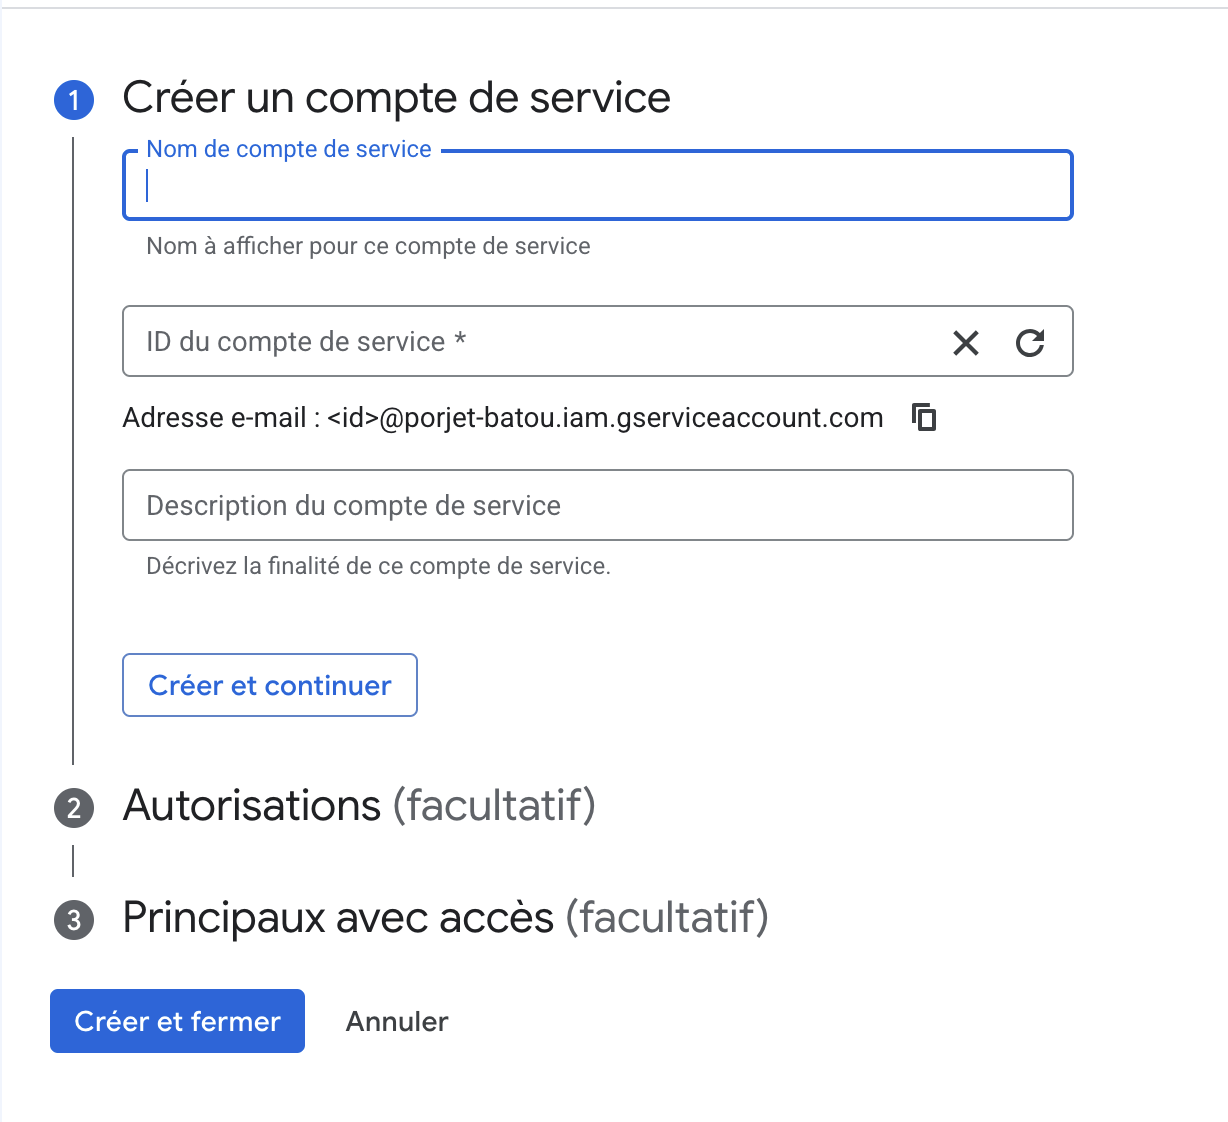
2. Create a service account
-
APIs & Services → Credentials → Create credentials → Service account.
-
Name it (e.g.
memority-googlechat-bot), give it and create it with Chat Admin permissions . -
Open the service account → Keys → Add key → Create new key → JSON. Download it.
-
In Memority, set this JSON as the Google Chat key setting
ntf.google-chat.key
(single secret setting, edited through the administration UI).
⚠️ A service account is an account for the bot to authenticate. You can emit as many service accounts for a Google Project as you would like, which is convenient if you wish to rotate them.


3. APIs & Services
3.1 Configure the OAuth consent screen
Required before the Marketplace SDK will let you save.
-
APIs & Services → OAuth consent screen (newer UI: "Google Auth platform") →
Get started. -
App Information — App name + User support email.
-
Audience — select Internal.
(If "Internal" is greyed out, the project is not attached to your Workspace org — fix
that first; Internal is what allows the app to be Private.) -
Contact Information — developer email → agree → Create.
⚠️ A bot cannot contact users without prior install by an admin or the users themselves. In both cases; an oauth consent screen is required.
3.2 Enable and configure the Google Chat API
-
APIs & Services → Library → Google Chat API → Enable.
-
Google Chat API → Manage → Configuration:
-
App name, Avatar URL, Description.
-
Interactive features — enable, and provide a placeholder HTTPS URL as the
connection endpoint. (We only post outbound; incoming interactions are unused, but
the Marketplace listing requires a configured, interactive Chat app.) -
App can be messaged directly — checked.
-
Visibility — available to everyone in your domain.
-
Save. This creates the Standalone Chat App deployment referenced next.
-
Here we added for our app the capability on Google Chat.
3.3 Enable the Google Workspace Marketplace SDK
-
APIs & Services → Library → Google Workspace Marketplace SDK → Enable.
-
App Configuration:
-
App Visibility: Private (only users in your domain). Cannot be changed after
saving. -
Installation Settings: Individual + Admin Install. (“Admin Only Install” is
not available for Chat apps; admins can still install domain-wide with this option.) -
App Integrations: enable Google Workspace add-on → under it choose HTTP or
other deployments → Deployment ID → Standalone Chat App (Configure Chat API). -
OAuth Scopes:
https://www.googleapis.com/auth/chat.bot -
Developer Information: name, email, website.
-
Save (draft).
-
-
Store Listing (separate tab — publishing lives here, not on App Configuration):
-
App Details — name, short + detailed description, category, language.
-
Graphic Assets — app icon (128×128) and required images.
-
Screenshots — at least one.
-
Support Links — Developer website, Privacy policy URL, Terms of Service URL.
-
Publish. A Private app publishes to your domain immediately, no Google review.
-
⚠️ This is where we define the look and feel of our bot, and user facing information. We also present the scopes we ask for. (the scopes previously given to the service account are the permissions we gave to the app).
4. Install the app for everyone
A super-admin installs the published app domain-wide:
-
Go to https://workspace.google.com/marketplace (or admin.google.com → Apps →
Google Workspace Marketplace apps → Apps list → Add app). -
Find your internal app → Install → Everyone at your organization (or a
specific OU / group) → accept scopes.
Propagation can take up to ~24h but is usually quick. After this the bot can cold-open DMs.
5. Get a user's Google Workspace ID (for testing)
You need the recipient's numeric Google user id (e.g. 108641998486991911066).
-
Use the Directory API
users.getexplorer:
https://developers.google.com/workspace/explore?discoveryUrl=https%3A%2F%2Fadmin.googleapis.com%2F%24discovery%2Frest%3Fversion%3Ddirectory_v1&operationId=directory.users.get
Pass the user's email asuserKey; the responseidfield is the numeric id. -
Alternatively, when the user DMs the bot, the incoming Chat event's
sender.nameis
users/<numeric-id>.
6. Define the Memority notification definition
Create/update the my-googlechat-notification definition on the tenant. Put the numeric user id in
recipients (literal), or use the identity role and pass the id via the event actor.
curl -sS -X PUT "[tenant_url]/api/notify/notification-definitions/google-chat/my-googlechat-notification" \
  -H "Content-Type: application/json" \
  -u "%USER%" \
  -w '\n%{http_code}\n' \
  -d '{
    "id": "my-googlechat-notification",
    "name": "GoogleChat",
    "eventType": "CITADEL_IDENTITY",
    "recipients": ["108641998486991911066"],
    "defaultLanguage": "en",
    "contents": [
      { "locale": "en", "textBody": "Hello from Memority 👋" }
    ]
  }'
Recipient resolution: for each entry in
recipients, Memority looks for an event actor
whoserolematches it and uses that actor'sgoogleChatId; if none matches, it uses the
entry literally as the id. So["108641998486991911066"]is the direct/literal form;
["identity"]instead pulls the id from theidentityactor in the dispatched event.
7. Send a test notification (QA)
Dispatch a CITADEL_IDENTITY event. This event type requires both a system and an
identity actor — omitting either fails validation.
curl -sS -X POST "[tenant_url]/api/ntf/event" \
  -H "Content-Type: application/json" \
  -u "%USER%" \
  -w '\n%{http_code}\n' \
  -d '{
    "type": "CITADEL_IDENTITY",
    "notifications": ["my-googlechat-notification"],
    "actors": [
      { "role": "identity", "uid": "alfred", "name": "huyn", "language": "en", "googleChatId": "108641998486991911066" }
    ],
    "payload": {},
    "parameters": {}
  }'
Success = HTTP 204 on the dispatch and a message appears in Google Chat.
Troubleshooting
|
Symptom |
Cause |
Fix |
|---|---|---|
|
|
Event missing a required actor role |
Include both |
|
|
Definition's |
Re-PUT the definition with |
|
|
Bot can't cold-open a DM |
Install the app org-wide (step 4), or have that user DM the bot once. |
|
DM goes to user |
|
Set |
|
Delivery silently does nothing |
Wrong / fake numeric id |
Re-check the id via Directory API |
Notes
-
Bot OAuth scope:
https://www.googleapis.com/auth/chat.bot. -
Replace
[tenant_url](the tenant base URL, e.g.https://<host>/<tenant>) and the
system@@admin:admincredentials with your environment's values. -
For a quick smoke test without any Google admin work, skip steps 1–5 and have the target
user message the bot once — that opens the DM space so step 7 lands.